One of the biggest benefits of having a WordPress website is the opportunity to create a loyal community from scratch, particularly by enabling comments on blog posts. When people have the option to interact with your content, they build a deeper connection with you as the author, and they also connect with other like-minded individuals.
Comments are a valuable form of user-generated content that can boost your SEO by keeping your pages fresh and updated. However, managing comments can come with challenges like spam and moderation.
In this article, we’ll walk you through the steps of enabling and disabling comments, preventing spam, changing user avatars, filtering content, and using tools like Gravatar and Akismet to enhance your comment section. By the end, you’ll have all the knowledge you need to create an engaging community around your WordPress blog.
How to enable comments in WordPress
Enable comments on new posts
- Go to Settings > Discussion.

- Enable the option for people to comment on new posts.
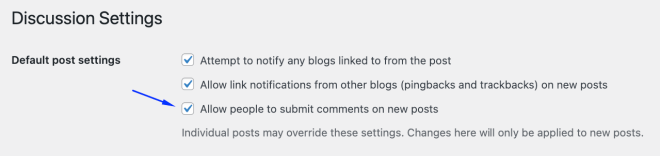
- Save your changes.
Enable comments on specific posts
- Navigate to Posts > All Posts or Pages > All Pages, depending on what you want to edit. We’ll go with a post in this example, but the process is the same for pages.
- Choose the post or page and click Edit.
- Go to the Discussion panel, which is located in the Post tab of the Gutenberg block editor, and click on Allow comments.
- Click Update or Publish, and you’re done!
Enabling comments for a particular post or a page can be useful in many cases. For example, if you release a new big feature of your product or service, you can create a post announcing it and enable comments to gather feedback, while the comments for the regular updates stay disabled.
How to disable comments in WordPress
While encouraging comment discussions can be great, you also need to make sure that your site has a clean and professional appearance. Sometimes that means disabling comments to prevent spam, inappropriate content, or heated debates on controversial topics. Disabling comments may also be necessary if you have limited moderation resources, want to maintain focus on your content, or have legal concerns. Ultimately, the decision depends on your unique situation and goals for your WordPress site.
Disabling comments globally
To disable comments for your entire site, go back to Settings > Discussion and then uncheck the box that says “Allow people to post comments on new articles.”

Remember that this setting will only affect future published posts and pages, not the existing content.
Disabling comments on existing posts and pages
To do this, you have two options. You can either go back to the individual post settings and uncheck the Allow comments box, or you can do this in bulk for multiple posts.
For the second option, do the following:
- Select all the posts you wish to change the settings for.
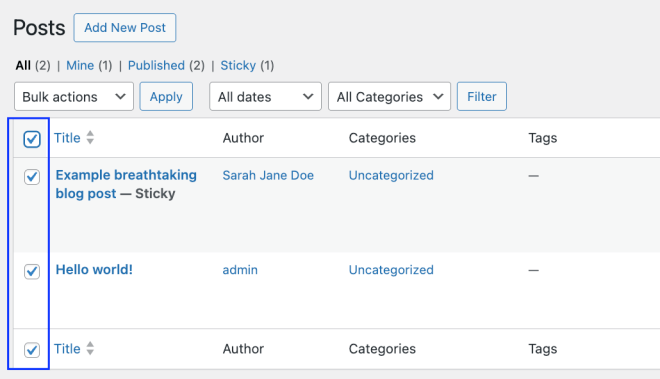
- Click on the Bulk Actions dropdown menu, select Edit, and then click Apply.

- In the bulk edit window, find the settings for the comments and change them to Do not allow. Save the changes.

Moderating comments with default WordPress settings
Disabling comments for some posts is okay, but we don’t recommend doing that for your entire blog as it puts a big barrier to communication between you and your audience. Instead, you can learn how to moderate comments through different methods.
Let’s see them!
Accessing comment moderation settings
From your WordPress dashboard, go to Settings > Discussion and there you will find more settings related to comment moderation.

One of the options, for example, is to make the commenter fill out their name and email, but that isn’t always effective in deterring more dedicated spammers as they will just fill out a fake name and email.
The other option is to limit comments only to registered users, which is great at first glance, but in reality, may discourage new users from engaging with your content. Not everyone wants to register for a site just to post a comment.
The last content moderation feature here is closing comments on posts older than a number provided by you, for example, 14 days. This is also not ideal because it takes time for blog posts to rank, and ideally your content will be discovered by new users long after it’s been published.
Manual approval of comments
Further down in the settings, you will find the manual approval functionality.

Here, you can choose to be notified for each comment or to only do that for people who comment for the first time. This is a great way to filter out spam and make sure only relevant comments are posted. However, it can be a bit overwhelming when your blog grows, and all of a sudden you have hundreds of comments to approve every day.
If you do have regular readers, their comments will be automatically approved.
Keyword and phrase moderation
Further down, you’ll find a box where you can include a list of trigger words that will put comments for moderation.

Common spam keywords include:
- CTAs like “Act now!”, “Apply now!”, “Call now!”, “Don’t hesitate!”, etc.
- Almost anything including the word “Free”, such as “free consultation”, “free offer”, “free trial”, etc.
- Anything related to extra income, such as “additional income”, “be your own boss”, “grow your business”, “double your”, “earn $”, “earn extra cash”, “earn from home”, “expect to earn”, and many more.
In the field above this box, you can also limit the number of links allowed in the comment, as one of the more common forms of spam includes links that prompt people to sign up for something.
There is also the option to directly delete comments with certain content, and it’s called “Disallowed Comment Keys.”
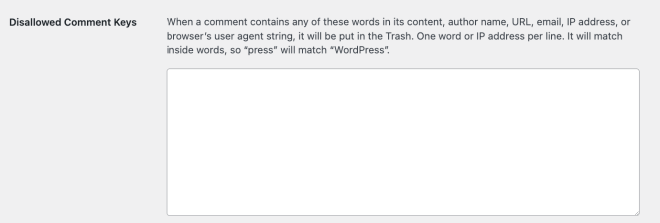
This setting allows you to include special keywords and phrases that signal spam and uncensored comments. If any of these words appear in the content, whether it’s the actual comment or the user name, email, IP address, and URL, then the comment will be automatically put in the Trash.
Email notifications
All of these triggers will appear as notifications but you can also enable emails so that you can keep a close look at your blog at any time.

Regular review and maintenance
Once you have all the settings you want, you also need to regularly check your spam folders for potential legitimate comments. Just because a comment was flagged as spam does not always mean it is genuinely spam.
It’s also recommended that you update your trigger words to include specific instances from your comment section, as well as email addresses, which are confirmed spammers.
Deep dive into avatar settings in WordPress
The avatar settings in WordPress allow you to customize how users appear on your website. You can go there by navigating to Settings > Discussion.
WordPress is connected to Gravatar, a digital identity platform by Automattic, that allows users to create a unique profile connected to their email address. By default, WordPress pulls in user avatars from Gravatar, using the profile connected with the same email address. If they don’t have a Gravatar profile, a default picture will appear, which you can change from the same settings.
Generally, it’s recommended that you encourage users to create and customize their Gravatar profiles instead of staying anonymous. This will help with consistency on your website but also many other aspects:
- Personalization: Custom avatars allow users to express their identity and make discussions more engaging.
- Recognition: Unique avatars help users recognize each other, fostering a sense of community.
- Professionalism: For businesses, consistent branding with a logo avatar builds credibility.
- Visual appeal: Avatars make comment sections more visually appealing and inviting for interaction.
By encouraging users to create Gravatar profiles, you can drastically reduce the amount of spam you receive as Gravatar users are always connected with legitimate email addresses. Besides that, they are often linked with their social media accounts, which are automatically verified by the platform.
If you want to learn more about how Gravatar profiles work, check out our documentation!
Tool to elevate comments sections on WordPress
Prevent spam with Akismet Anti-Spam

Akismet is a tool by Jetpack created specifically to battle spam on WordPress sites. It comes packed with features that allow you to automate verification processes and create a distraction-free environment for your genuine users to engage and comment on posts and pages.
Its main features include:
- Automatic spam detection: The plugin automatically detects and filters out spam comments, trackbacks, forum posts, WooCommerce product reviews, and contact form submissions. Everything is sent to the Spam folder.
- Real-time monitoring: This feature captures spam right as it happens. Unwanted comments and submissions are automatically removed so that your site doesn’t include this type of content even for a second.
- Spam reporting: Users can teach Akismet by reporting spam directly from the WordPress dashboard, improving its accuracy and helping it learn your specific triggers. This way, no legitimate traffic is flagged as spam.
- Full integration: The plugin easily integrates with popular contact form plugins like WP Forms, Gravity Forms, and more, and it also has a reliable spam protection network.
- Compliance with regulations: With Akismet, you can choose to display a privacy notice so that people are aware of their comments being scanned by a tool. This helps you become fully compliant with regulations like the General Data Protection Regulation in the European Union.
Its spam-protection capabilities work both on comments and form submissions so you can receive only relevant and real user interactions.
Leverage Gravatar profile integration for a better community
Beyond WordPress’s default integration with Gravatar for pulling in user avatars, Gravatar’s REST API allows website owners and developers to import user profile data and build customized profile pages for their WordPress users. This powerful integration enhances the overall experience on comment threads by enabling users to visit commenter profiles and learn more about them.
When integrated, the REST API gives you access to important user information such as:
- Their profile bio
- Location
- Website URLs
- Payment links
- Verified social media profiles
- Additional images
- And much more!
With this data, however, WordPress site owners can create dynamic and informative user profiles, which can significantly improve the sense of community and encourage more meaningful interactions within comment sections.
It’s also great for the overall user experience because it gives your visitors a special place on your site without having to register and fill in the same information from scratch.
Another great feature of Gravatar is the Hovercard – a dynamic mini-version of a user’s Gravatar profile that shows up when you hover your mouse over their profile picture.
This allows other site visitors to quickly access information about another user without leaving the page, giving them valuable context in the specific situation.
Actively using and encouraging users to take advantage of Gravatar has the power to create strong communities that actively engage with each other. It also incentivizes them to create and maintain their digital identities with the platform.
Ready to build an engaging platform? Activate comments in WordPress now
With the right tools and techniques, WordPress comment sections can become a hub for engaged communities and a place to foster loyal relationships with users and other visitors. And if you’re apprehensive because of potential spam, remember that the payoff from having a community is definitely worth it.
It improves your reputation and takes your website to a whole different level – from a passive content platform to a place where people can communicate with like-minded individuals, share ideas, and learn new things.
With Gravatar profiles and the REST API, this communication hub can become even more engaging, so don’t wait! Integrate your website with Gravatar today and make your comment sections come alive!

You must be logged in to post a comment.